
Whether you’re preparing for a big launch, running a members-only store, or simply need some downtime to refresh your storefront, the Shopify password protection page is one of the most useful built-in features the platform offers. It lets you keep your store private while still maintaining full control behind the scenes. In this guide, we will discover how to enable the password page Shopify provides, how to edit and customize it to match your brand, and what you need to know about its impact — no developer required.
What is the Shopify password protection page?
The Shopify password page is a built-in feature that replaces your entire storefront with a locked screen. Visitors who land on your store URL see a simple page asking them to enter a password before they can browse any products, collections, or content.
Think of it as a velvet rope for your online store. You control who gets in, when, and how they’re greeted at the door.
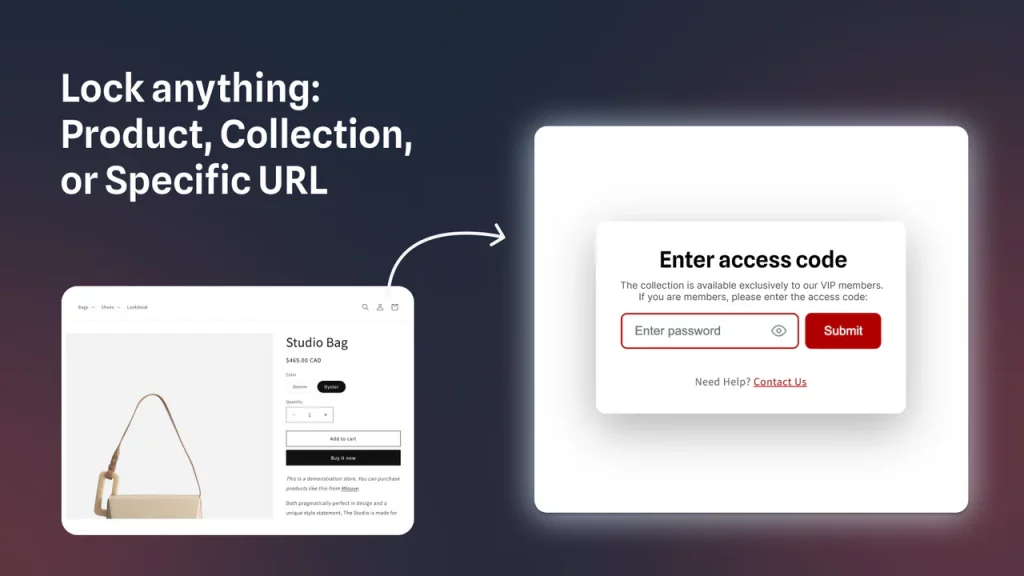
It’s important to understand one key distinction: the Shopify password protection page applies to your entire store, not just a single page or product. When it’s enabled, every URL on your domain — your homepage, product pages, collection pages — redirects to the password gate. If you need to restrict only specific pages (like a wholesale price list), you’ll need a third-party app or custom liquid code instead.
When should you use Shopify password protection?
Knowing when to use the password page is just as important as knowing how.
Pre-launch blinds. This is the most common scenario. You’re building out your Shopify store, loading products, setting up payment gateways, and configuring shipping — but you’re not ready for the public yet. Enabling a password protect Shopify page lets you work freely behind the scenes without worrying about customers stumbling into an unfinished storefront.
Wholesale or members-only access. Some merchants run stores that are intentionally closed to the general public. A wholesale portal, a private client shop, or a brand ambassador store can all benefit from staying password-gated permanently, with the password shared only with approved buyers. In these cases, merchants often use Shopify edit password page to include custom instructions, login details, or branded messaging for members.
Windows redesigns and maintenance. When you’re switching themes, updating navigation, or making significant structural changes, going live during the process can confuse or frustrate customers. Enabling the password page Shopify provides gives you a clean maintenance buffer.
Exclusive product drops and pre-order campaigns. Some brands use the password page strategically as part of a marketing campaign — sharing a password only with email subscribers or VIP customers to create a sense of exclusivity around a new product launch.
How to enable the Shopify password page
Enabling the Shopify password page takes less than two minutes. Here’s how you do it:
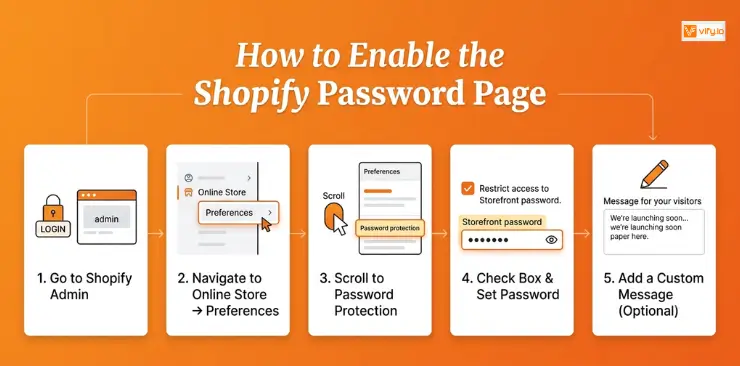
Step 1: Go to your Shopify Admin
Log in to your Shopify admin dashboard
Step 2: Navigate to Online Store → Preferences
In the left sidebar, click Online Store, then select Preferences from the dropdown menu.
Step 3: Scroll to the “Password protection” Section
On the Preferences page, scroll down until you see the Password protection section. You’ll see a checkbox labeled “Restrict access to visitors with the password.”
Step 4: Check the Box and Set a Password
Check the box to enable password protection. A field will appear asking you to enter a storefront password. Choose something memorable enough to share with invited visitors, but not so obvious that it defeats the purpose.
Step 5: Add a Custom Message (Optional)
You’ll see a field labeled “Message for your visitors.” This text appears on the password page below your store name. Use it to set expectations — something like “We’re launching soon. Enter your password to get early access.”
Step 6: Click Save
Hit Save at the top right. Your password page is now live. Visit your store URL in a private/incognito browser window to confirm it’s working correctly.
How to Disable (Turn Off) the Password Page
When you’re ready to open your store to the public, simply return to Online Store → Preferences, uncheck the “Restrict access to visitors with the password” box, and save. Your store is immediately accessible to everyone.
How to edit the Shopify password page
Once the password protection is active, you’ll likely want to make it look like your brand rather than the default Shopify template. Here’s how to access and use the password page editor.
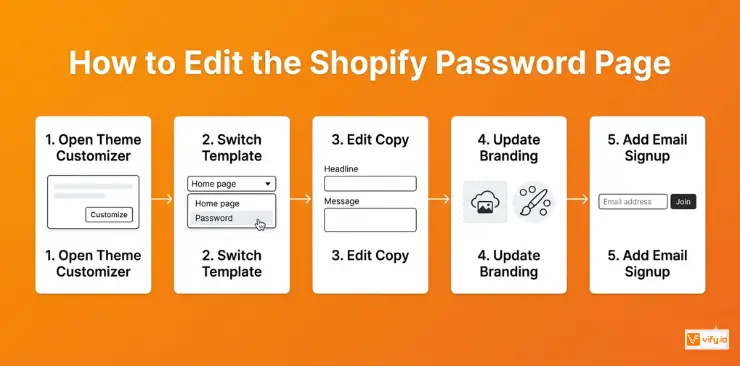
Step 1: Open the Theme Customizer
From your Shopify admin, go to Online Store → Themes. Click the Customize button on your active theme.
Step 2: Switch to the Password Page Template
Inside the theme customizer, look for the page template selector at the top center of the screen (it usually shows “Home page” by default). Click the dropdown and select Password from the list of templates.
Your theme editor will now display a live preview of your password page, and the left sidebar will show the sections and settings you can edit.
Step 3: Change the Headline, Subheading, and Message Copy
Click on the text elements in the preview to edit them directly, or use the left sidebar controls. Most themes let you customize:
- The main heading (eg, “Opening Soon” or your store name)
- The subheading or message (eg, “We’re putting the finishing touches on something great”)
- The password field label and button text
This is where your brand voice matters. Avoid generic placeholder text — use this space to generate excitement, communicate your launch timeline, or offer a teaser of what’s coming.
Step 4: Update the Logo, Background Image, and Brand Colors
Still in the theme customizer, look for the Header or Logo section and upload your brand logo. For the background, most themes allow you to:
- Set a solid background color using your brand palette
- Upload a full-width background image (a product shot, lifestyle photo, or a branded graphic works well)
- Set text colors to ensure readability against your chosen background
Step 5: Add a Newsletter/Email Signup Form
This is one of the most valuable things you can do with your password page Shopify setup — collect email addresses before you launch. Most modern Shopify themes include a newsletter signup option directly in the password page template.
Enable it from the theme customizer’s left panel. When visitors enter their email, it gets added directly to your Shopify customer list or your connected email marketing platform.
This turns a dead-end gate into an active lead generation tool.
Conclusion
The Shopify password protection page is far more than just a temporary lock screen — it’s a practical tool for managing launches, protecting private storefronts, running exclusive campaigns, and maintaining a polished customer experience while your store evolves behind the scenes. With Shopify’s built-in customization options, you can easily transform the default password page into a branded experience that builds anticipation, captures leads, and keeps your store looking professional even before launch.
If you’re selling on Shopify and need a professional invoice solution, then Vify Shopify Order Printer app is the best choice for you. Try it for free today and experience it for yourself. We’re confident you’ll love it.